In React development, sharing data between components efficiently is crucial for building scalable applications. The useContext hook provides a way to access values without prop drilling, making component interactions smoother. In this guide, we will explore the fundamentals of usecontext, highlight five best practices, showcase ten practical examples, and answer common questions.
The Context hook in React provides a simple way to share data across components without prop drilling. It allows any component to access values from a context directly, improving code readability and maintainability. Context is created using createContext, and then made available to child components via a Provider. Components can use the Context hook to consume the shared values easily. Common use cases include managing themes, authentication status, and user preferences. By using Context, developers can build scalable applications with cleaner component trees, especially when multiple nested components need access to the same data.
What is useContext in React?
The Context hook in React allows you to subscribe to React context without introducing complex patterns or excessive prop passing. Context provides a way to share values like themes, authentication, or settings across the component tree.
By combining React’s createContext API with context, developers can achieve cleaner, more maintainable codebases.
How useContext Works in React
Here’s a simple flow:
Create a Context using createContext.
Provide a Context Value using a Provider.
Consume the Context Value inside any child component using context.
This avoids deeply nested props and helps components access shared state easily.
📚 Best Practices for Using useContext in React
1. Create Separate Context Files
Keeping your context in separate files improves modularity and maintainability. It’s best to create a context folder where you define and export your contexts.
2. Always Wrap Context with Providers
Without a provider, components trying to consume a context will get undefined. Always ensure your components are properly wrapped within the corresponding Provider.
3. Combine useContext with useReducer for Complex States
When your context deals with complex or nested states, it is better to pair context with useReducer for better state management.
4. Avoid Overusing useContext for All State Management
Context is great for global data like authentication, theme, or user settings. However, avoid using context for local component states; use useState instead. Overusing context can lead to performance bottlenecks.
5. Memoize Context Values
If your context value changes frequently, wrap it with useMemo to avoid unnecessary renders of all consuming components.
✨ 10 Practical Examples of useContext in React
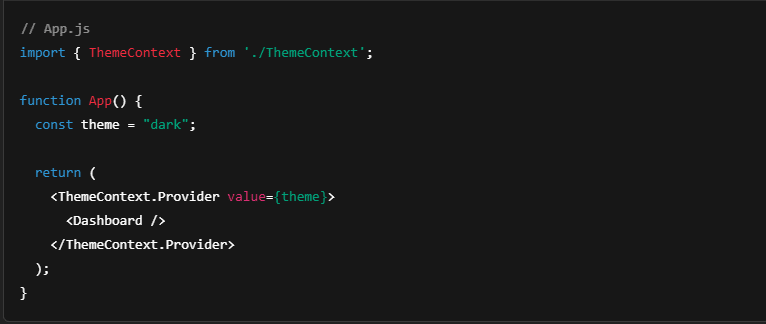
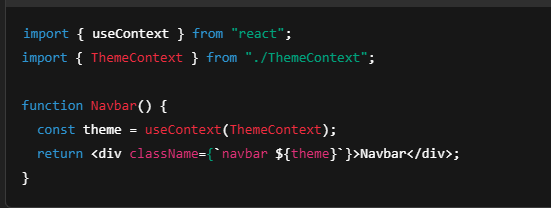
1: Theme Toggling
1. useContext Hook:
React Hook to consume context value inside a component.
2. ThemeContext:
A context that holds the current theme value like 'light' or 'dark'.
3. Getting Theme:
const theme = useContext(ThemeContext); fetches the current theme.
4. Applying Theme:
Theme value is added as a CSS class: className={navbar ${theme}}.
5. Styling Based on Theme:
The Navbar’s appearance changes based on the current theme (light or dark).
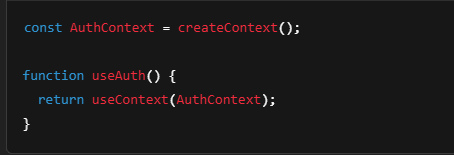
2: Authentication Context
1. createContext():
Creates a new Context object called AuthContext.
2. AuthContext:
A place to store and share authentication-related data across components.
3. useAuth Custom Hook:
A small function that uses useContext(AuthContext) to access AuthContext easily.
4. Purpose of useAuth():
Instead of writing useContext(AuthContext) everywhere, you just call useAuth().
5. Reusability:
Makes the code cleaner, reusable, and easier to manage authentication state.
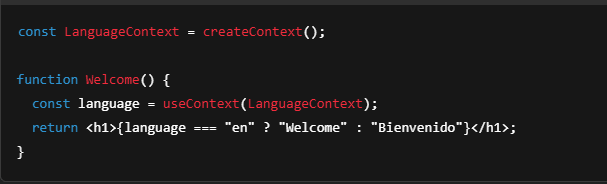
3: Language Preference Context
1. createContext():
Creates a LanguageContext to store the current language (like "en" or "es").
2. useContext(LanguageContext):
Reads the current language value inside the Welcome component.
3. Conditional Rendering:
If language is "en", it shows “Welcome”.
Otherwise (any other language), it shows “Bienvenido”.
4. Dynamic Content:
The text changes automatically based on the selected language
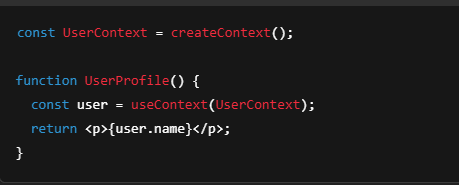
4: User Profile Context
1. createContext():
Creates a UserContext to store user data (like name, email, etc.).
2. useContext(UserContext):
Reads the current user information inside the UserProfile component.
3. user Variable:
user now holds the data provided by UserContext.Provider (like {name: "John"}).
4. Usage Purpose:
You can display or use user information easily inside UserProfile.
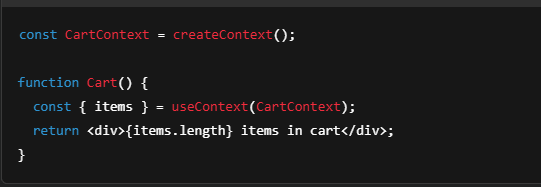
5: Shopping Cart Context
1. createContext():
Creates a CartContext to store shopping cart data.
2. useContext(CartContext):
Reads the current cart value inside the Cart component.
3. { items }:
Destructures items from the cart context (an array of cart products).
4. Showing Cart Items:
Displays the number of items in the cart using items.length.
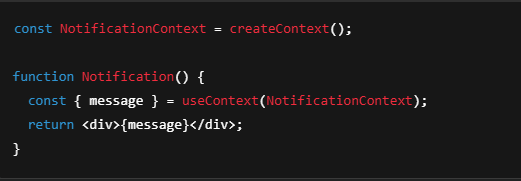
6: Notification Context
Lorem ipsum dolor sit amet, consectetur adipiscing elit. Ut elit tellus, luctus nec ullamcorper mattis, pulvinar dapibus leo.
7: Dark Mode Toggle
1. createContext():
Creates a NotificationContext to store notification-related data, like a message.
2. useContext(NotificationContext):
Reads the current message inside the Notification component.
3. { message }:
Destructures message from the NotificationContext, which contains the notification text.
4. Displaying Notification:
Displays the message (e.g., “You have a new notification”) in a <div>.
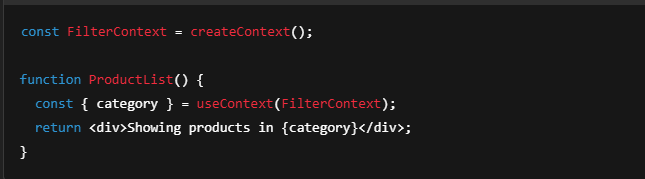
8: Product Filter Context
1. createContext():
Creates a FilterContext to store filter-related data, such as the selected product category.
2. useContext(FilterContext):
Reads the current category value inside the ProductList component.
3. { category }:
Destructures category from the FilterContext, which represents the selected category (e.g., “Electronics”).
4. Displaying Filtered Products:
Displays the text “Showing products in [category]” (e.g., “Showing products in Electronics”) based on the current filter.
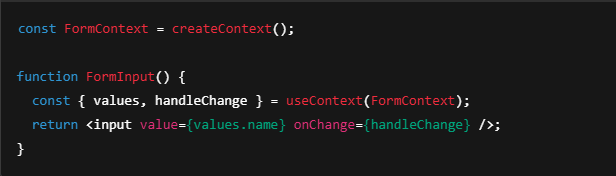
9: Form State Context
1. createContext():
Creates a FormContext to store form data and event handlers like input values and change functions.
2. useContext(FormContext):
Reads the current values (form data) and handleChange (event handler) inside the FormInput component.
3. { values, handleChange }:
Destructures values (which contains form data like name) and handleChange (a function to update form data) from the context.
4. Input Binding:
The input’s value is bound to values.name, meaning it will display the name field from the form state.
The onChange event uses handleChange to update the value in values when the input changes.
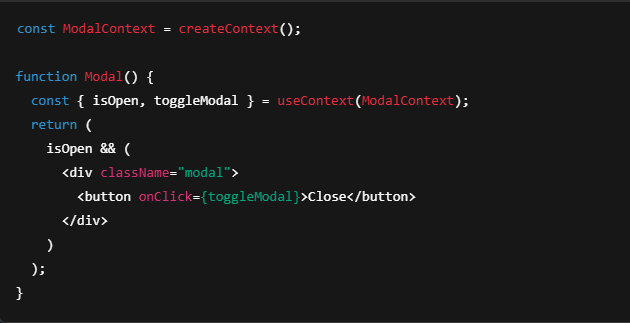
10: Modal State Context
1. createContext():
Creates a ModalContext to store modal-related data, such as whether the modal is open or closed and the function to toggle its state.
2. useContext(ModalContext):
Reads the current isOpen (whether the modal is open) and toggleModal (function to toggle the modal state) inside the Modal component.
3. { isOpen, toggleModal }:
Destructures isOpen (boolean) and toggleModal (a function to change the state) from the context.
4. Conditional Rendering:
If isOpen is true, the modal is displayed (<div className="modal">).
A button inside the modal calls toggleModal to close the modal when clicked.
🙋♂️ Frequently Asked Questions about Context in React
What problems does Context solve?
context solves the problem of prop drilling. Instead of passing props manually through every level of your component tree, context allows any component to access needed data directly.
Is Context better than Redux?
It depends. context is lightweight and great for simple state sharing. However, for large, complex applications involving async logic or middleware, Redux or React Query may be more appropriate.
Can I use multiple useContexts in one component?
Yes! A single component can consume multiple contexts.
When should I not use useContext?
Avoid using context for high-frequency updates (e.g., real-time typing) as it can cause unnecessary re-renders across the app. In such cases, useState or dedicated libraries are better options.
How does useContext affect performance?
If not memoized properly, every change in a context value causes all consumers to re-render. To optimize, use useMemo and split contexts logically to reduce unnecessary renders.
📌 Final Thoughts
Understanding and using context efficiently helps you write cleaner, scalable React applications. By following the best practices outlined in this guide, you can prevent performance issues and make your React architecture future-proof. Whether you are building authentication flows, shopping carts, or theme switchers, context is a vital tool every React developer should master.
Keep experimenting and apply these patterns smartly to enhance your development workflow on projects like Freshy Blog or beyond.
Undeniably believe that which youu said. Your favorite reason seemed to be on the internet the simplest factor to be mindful of.
I say too you, I definitely get irked at the same time as folks think about
concerns that they just do not recognize about. You manage to hit
the nail upon the highest andd outlinjed out the whole
thing with no need side-effects , folks could
take a signal. Will likely be back to get more. Thank
you http://Boyarka-inform.com/
Thank you so much for your thoughtful and encouraging words! 😊
I’m really happy to hear that the article resonated with you and clarified things well.
Your support means a lot and motivates me to keep providing clear and helpful content.
Looking forward to having you back for more insightful posts!